When we need to download videos for offline playback from various sites such as YouTube, Twitter, Netflix, Instagram and Facebook, we might always tend to find a free video downloader to qualify for the job. However, a completely free video downloader without any adware or malware is hard to find even in our previous reviews of various video downloaders. Then, here comes the question: can we download videos without using a video downloader? Don’t limit our thoughts on just this. Actually, we do have other choice to download online videos and it’s 100% free: save online videos from browser cache.
In this how-to article, you’ll learn what the browser cache is, where the cached files of Chrome, Safari, Firefox, Edge, Internet Explorer and Opera are on both Windows and Mac, how to extract downloaded videos from browser cache, how to save buffered videos from browser cache with VideoCacheView, the advantages and disadvantages of the introduced ways of exporting loaded videos from browser cache, and whether there are other ways to download videos from Web pages.
What’s browser cache?

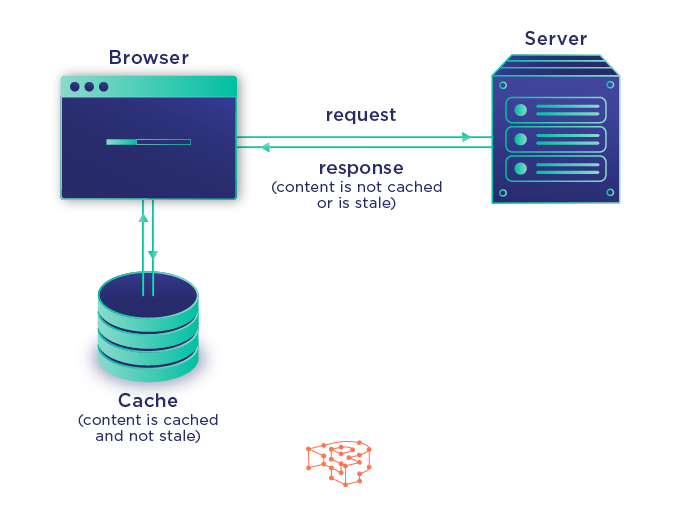
When we visit a page in the browser like Chrome, Safari, Edge, Firefox, all the images, videos, CSS, Javascript and other resources used on that page will be buffered and temporarily stored in a specific location on our device. In such a way, our next access to that page will be much smoother and faster as the pervious cached content will be loaded directly from the cache folder instead of the server of the website again. This mechanism saves resources buffering time, minimizes bandwidth consumption and brings performance gains so as to give the Internet surfing a snappier experience.
Therefore, we have the opportunity and possibility to extract a loaded video from the cache files the browser.
Where are the cached files?
The cache location varies in different browsers, browser versions, operating systems and OS versions.
Tips:
Please replace “USERNAME” with your username.
The folders Local Settings, Application Data and AppData are system ones and they are hidden by default, so you may need to change your preferences in the View tab of File Explorer to show the hidden files and folders in Windows 11 (Windows 10, Windows 8.1 and Windows 7) to find the cache file.
Use the links to find the cache files of your browser quickly.
- Cache folder of Chrome on Windows
- Cache folder of Firefox on Windows
- Cache of Safari on Windows
- Cache folder of Microsoft Edge on Windows
- Cache folder of Internet Explorer on Windows
- Cache folder of Safari on macOS
- Cache folder of Chrome, Firefox and Opera on macOS
Cache folder of Chrome on Windows:

Way 1: Go to chrome://version/ in Chrome. Find the directory of the Profile Path. The Cache should be inside that directory.
Way 2: Access C:\Users\USERNAME\AppData\Local\Google\Chrome\User Data\Default\Cache directly in File Explorer.
Way 3: Press the Windows key + R on your keyboard, and paste the path in the Run command window to open the cache folder of the browser.
Cache folder of Firefox on Windows:
Way 1:
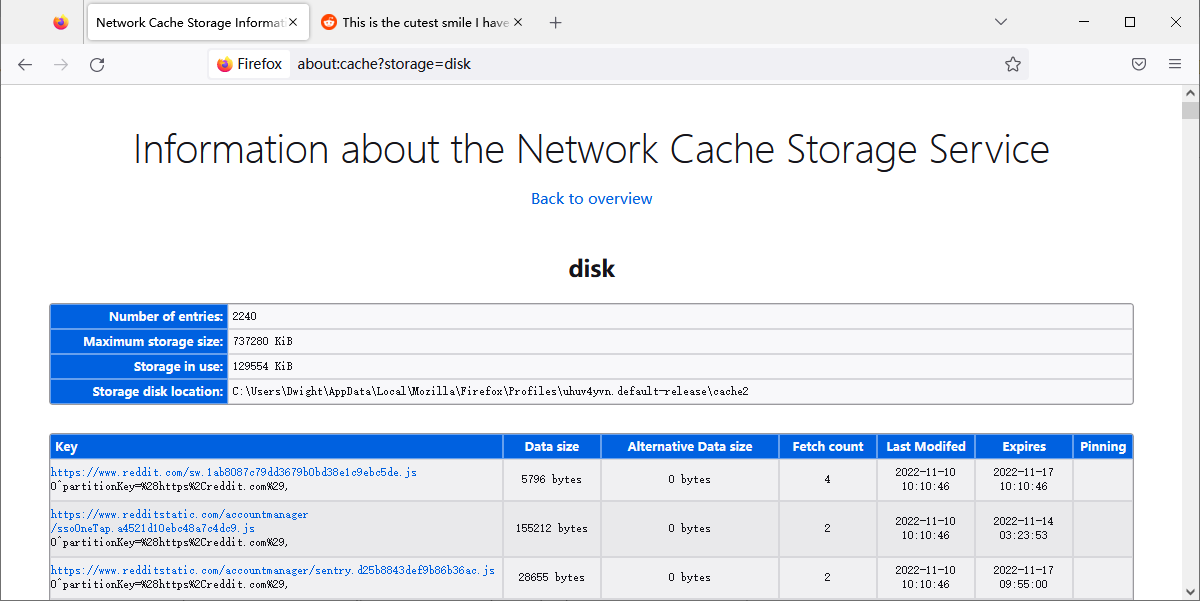
- Access “about:cache?storage=disk” in the address bar of Firefox. (The following steps do the same job: open the Network Cache Storage Service page by visiting “about:cache”; click List Cache Entries under the long path of Storage disk location in the disk section.) In Chrome version lower than 66, you might need to replace “about:cache” with “chrome://view-http-cache/” instead.
- The path to the cache folder can be found beside Storage disk location. And all the cache files available will be listed by Key (original URL), Data size, Alternative Data size, Fetch count, Last Modified, Expires and Pinning. Surely, we can also press “Ctrl-F” to find the target video if a search phrase is provided.

Way 2:
Access the cache folder in directly in File Explorer:
- For Windows 10/8: C:\Users\USERNAME\AppData\Local\Mozilla\Firefox\Profiles\{profile folder}\cache2
- For Windows 7: C:\Users\USERNAME\AppData\Local\Mozilla\Firefox\Profiles\{profile folder}\Cache\
- For Windows XP: C:\Documents and Settings\USERNAME\Local Settings\Application Data\Mozilla\Firefox\Profiles\{profile folder}\Cache\
Cache of Safari on Windows:
Open the following directory in File Explorer according to the version of your Windows:
- On Windows 10: C:\Users\user\AppData\Local\Apple Computer\Safari
- On Windows 7: \Local Settings\Application Data\Apple Computer\Safari
- On Windows XP: C:\Document and Settings\[username]\Local Settings\Application Data\Apple Computer\Safari
Cache folder of Microsoft Edge on Windows:
Directly access the following path in File Explorer on your computer:
- C:\Users\USERNAME\AppData\Local\Microsoft\Edge\User Data\Default\Cache
- C:\Users\Users\USERNAME\AppData\Local\Packages\Microsoft. MicrosoftEdge_xxxx\AC\#! 001\MicrosoftEdge\Cache\
Cache folder of Internet Explorer on Windows:
Way 1:
- Use any of the following 3 ways to open Internet Options:
- Open Control Panel, then select Network and Internet > Internet Options.
- In the Run dialog box or from Command Prompt, enter the inetcpl.cpl command.
- From Internet Explorer, select Tools > Internet options.
- Click the General tab.
- Click the Settings button in the Browsing history section.
- Click View files button under Temporary Internet Files tab in the popup Website Data Settings dialog box to open the cache folder of IE in the Windows Explorer.

Way 2:
Directly open the cache directory of Internet Explorer in File Explorer.
- Internet Explorer 11: \Users\USERNAME\AppData\Local\Microsoft\Windows\WebCache\WebCacheV01.dat
- Windows 10 and Windows 8:
C:\Users\USERNAME\AppData\Local\Microsoft\Windows\INetCache - Windows 7 and Windows Vista:
C:\Users\USERNAME\AppData\Local\Microsoft\Windows\Temporary Internet Files - Windows XP:
C:\Documents and Settings\USERNAME\Local Settings\Temporary Internet Files
Cache folder of Safari on macOS:
- Launch Finder app;
- Hold Cmd + Shift + G;
- Input /Users/USERNAME/Library/Containers/com.apple.Safari/Data/Library/Caches/
- Press Enter.

- In earlier versions of macOS, the folder is located in /Users/USERNAME/Library/Caches/.
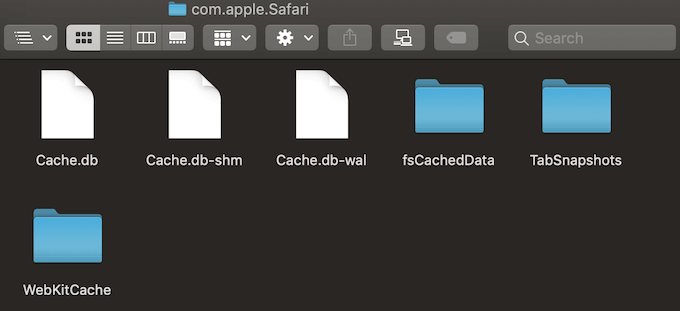
- The cache file of Safari is a whole database file named Cache.db programed in SQL. You may need to use the professional tool DB Browser for SQLite to view the data in the cache file.
Cache folder of Chrome, Firefox and Opera on macOS:
Way 1:
- In Finder, click on Go and then Go to Folder,
- Paste the following path and press Go: /Users/USERNAME/Library/Caches/ Default/Caches

Google Chrome’s cached files will be in the Google > Chrome > Default > Cache folder. For Firefox and Opera look for the Firefox and Opera cache folders respectively.
Way 2:
- Open Finder.
- Press and hold the Option key
- Choose Go > Library
- Find the Caches folder.
- Find the corresponding Chrome, Firefox and Opera cache folder of your browser.
- Chrome: /Users/USERNAME/Library/Caches/ Default/Caches/Goolge/Chrome/Default/Cache/
- Firefox: /Users/USERNAME/ Library/Caches/Firefox/Profiles/
- Opera: /Users/USERNAME/ Library/Caches/com.operasoftware.Opera/
Way 3:
It also works good to access “chrome://version/” or “about:cache?storage=disk” in the address bar in Chrome or Firefox respectively to find the cache folder on macOS as it does on Windows.
How to save downloaded videos from cache of browser?
Here, we’ll take Chrome as an example to show the steps to extract videos from Chrome cache files.
- Open the page that contains the target video that you want to download.
- Play the video and wait until the video is completely buffered.
- Locate the cache directory.
- Find the videos files by sorting the pile of cache files by size since the larger ones are usually video files.
- Rename the files and add the .flv or .mp4 extension.
Now the videos can be played with a video player such as VLC player, PlayerFab and UniConverter Player.
Though this method is 100% free and we don’t need to install or use any extra software or plugin on our device, it’s still difficult to extract videos from the browser cache especially for novices since there are lots of disadvantages:
- The file names in the cache folder are obscured. It’s hard to identify videos files even through file size.
- The file extensions of the videos cached from different sources may vary so that we might need to try multiple possible file extensions for one file.
- Previously cached videos may have to make space for newer files.
- Large files may not be cached due to limited storage for the browser.
- The size of storage space available for cache files may be limited in some browsers and devices.
- Some videos may be cached partially.
- Some cached videos such as flash videos will be removed once the browser is closed.
- Some sites may use encryption technologies to prevent videos from being downloaded.
- Videos that have never been loaded in the browser won’t appear in the cache.
How to extract buffered videos from browser cache with VideoCacheView
When we find it’s hard to distinguish target videos files from a pile of cache files, we should leave professional things to professional tools. The tool VideoCacheView can solve the problem easily and perfectly.
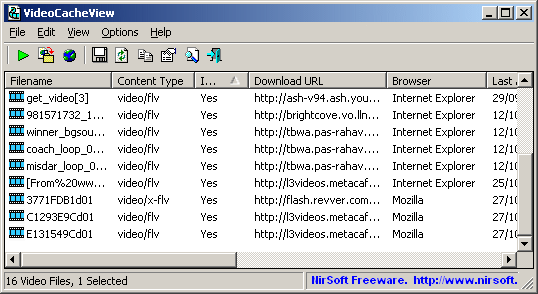
VideoCacheView is a free and open-source cache viewer utility that is capable of scanning the entire cache of Internet Explorer, Mozilla-based Web browsers (Including Firefox), Opera, and Chrome within seconds, then extracting videos from cache easily and saving to local disk freely for future offline playback.
With VideoCacheView, it’s easy to save downloaded videos in browser cache or temporary folder as playable files that video players can recognize.
Follow the steps as below:
- Download VideoCacheView and GPAC, then run VideoCacheView;
- Wait 5 to 30 seconds until VideoCacheView finishes scanning;
- Play the listed videos with the default media player of your system or judge the target videos with the listed parameters (such as Download URL, Title, Browser, Last Accessed Data and File Size) to find the videos that you are trying to download.
- Save the wanted video to your video library.

Pros:
- No additional DLL files or installation process is required to save downloaded videos from browser cache or temporary.
- The scanning usually finishes in 5 to 30 seconds.
Cons:
- Not all the found videos show data in the Title column, it’s still difficult to find the video that you are trying to download.
- VideoCacheView only has Windows versions. It works on Windows 10 or earlier versions.
- Safari cache is not supported by VideoCacheView.
- It not the default option to load videos from Internet Explorer 10/11. You may have to check the box beside the option manually if it’s needed.
- You might need to turn to a video converter to transcode the output videos to the most popular MP4 format.
- The saved videos may get corrupt if the browser keeps running when you are extracting videos from the cache.
- In Windows 7 with User Account Control enabled, you may have to run VideoCacheView as administrator to saving downloaded videos from “Temporary Folder”.
- Videos streamed via the Streaming Microsoft Media Server (MMS) protocol, (whose URL starts with mms://, mmst:// or http:// and ends with .asf, .wmv or .asx) cannot be extracted from browser cache with this cache extractor.
Tips:
- The quality of the video extracted from the cache files depends on the resolution you choose when playing the video in your browser.
- In Firefox, cache files won’t be saved to the local cache folder until the browser is closed. Therefore, if you need to extract videos from Firefox with the cache viewer, you may have to close all the tabs and windows of Firefox.
- Though the video loaded in Firefox won’t appear in the cache folder when Firefox is still running, VideoCacheView can still extract the video from the “Temporary Folder” entry alternatively as long as the browser tab that buffered the video has not been closed.
- Generally, you don’t have to run VideoCacheView “Run As Administrator” to extract videos from browser cache.
- If you don’t want to get an incomplete or corrupt video, you should let the video be fully buffered.
- Make sure you have enough space on your hard drive since there is possibility that the extracted videos might be partial or corrupt due to lack of enough storage space.
- Presently, 2 WebM streams (one video stream and one audio stream) are used in each video we play on YouTube, VideoCacheView will extract the 2 streams separately so that you might have to merge the video and audio streams using a third-party video editor or video transcoder.
- In browsers that use MP4 streams or have WebM feature disabled, VideoCacheView will also save the audio and video streams of YouTube videos separately. However, if the open-source software package: GPAC has been installed, VideoCacheView automatically detects it and uses MP4Box installed as a part of GPAC package to merge the 2 mp4 streams into a single mp4 file.
- To disable WebM streams in Firefox, visit “about:config” in the address bar, change the “media.webm.enabled” value to false.
- Although Safari is not in the support list of VideoCacheView, you can download SafariCacheView from the same developer to read and parse cache file of Safari Web browser (cache.db).
- SafariCacheView only works on Windows 7 and previous versions. If you want to find the videos in the Safari cache on macOS, transfer the cache.db file to Windows.
Final Words:
All in all, you can extract downloaded videos from the cache files of Chrome, Firefox, Edge, Internet Explorer, Safari and Opera directly or with the help of VideoCacheView or SafariCacheView. However, there are still lots of challenges to face especially:
- The locations of cached files for different browsers and browser versions on different system platforms and OS versions may vary considerably so that it becomes difficult to find the temporarily downloaded files.
- Even with the help of VideoCacheView, it’s hard to distinguish videos files from hundreds of files with obscure or random file names while without files extensions.
- The found buffered videos might be corrupted or clips of the original videos due to all kinds of unexpected or unknown reasons.
- To get the videos fully cached in your local disk, you might need to wait until the video are completely loaded, which is troublesome and usually takes much time.
- When using VideoCacheView to extract downloaded videos from Web pages, you might sometimes still need to play the videos one by one to recognize the video you are looking for, you might sometimes find the all the file sizes are zero.
Given the above flaws in saving downloaded videos from cache with or without VideoCacheView, a professional but easy-to-use video downloader like Streamfab and Internet Download Manager (IDM) is highly recommended. The video downloaders may cost some bucks, however, you won’t have any worries anymore about how to find the cache folders, how to extract the buffered videos from cache, how to find the target video among lots of files, what’s the extension of the target video, how to download videos in batch……